Together with the Mblock program, we will make Night and Day Applications. When we run the Night and Day Application, which we made together with the Mblock program, when we press the letter "A" on the keyboard, a brighter scene decor will appear on the screen and the word "Gündüz" will appear and our LED will not light. When we press the letter "S", a darker stage decoration will appear next night and our LED will light up in the circuit we have created. We will make this application in the Mblock program. Before moving on to the codes, the list of materials to be stretched in our led circuit:
1-Arduino Uno
2-BreadBoard
3-LED
4-220Ω Resistor
5-Jumper Cables
We need supplies.
We add a 220 ohm
resistor to the long leg of the Led that we added to our breadboard. We connect
one leg of the resistor with a jumper cable to the digital pin 8 of our ardunio
uno material (You can connect your jumper cable to any digital pin you want
between 2-13). The circuit diagram is below.

Now let's come to
our codes in mBlock; City with water (the dark one) city with water 2 (the
bright one) in the Mblock backdrop library as a scene decor.

I added a sprites to the scene.

The code part is as
follows:

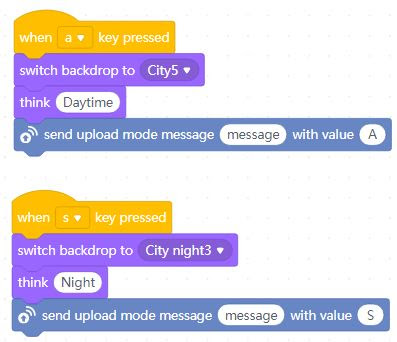
When the
"a" key is pressed on the keyboard, switch to the bright decor (we
add it from the Looks menu) and we do not turn on our led with the code to
set the digital pin 8 low (we add it from the Robots menu) and the speech
bubble called dummy Day appears (we add it from the Looks menu). When the
"S" key is pressed, it will switch to the dark decor, and by making
the digital pin 8 high, we make it light up. We make the sprites think it's
night. In order to run these codes, after connecting our arduino board and
circuit to the computer with a usb cable, we first select the Serial port from
the Connect menu, then select the port to which our arduino board is connected.
After selecting it, we will upload the codes we wrote with the firmware update
from the connect menu again to our arduino board. Thus, our program becomes
ready to run.
To download the source code of the program CLICK HERE (This program ise done with mblock 5 version)
Note: You can upload the codes to the arduino uno board by pressing the connect and upload buttons at the bottom of the screen respectively.


First of all, we add the upload mode broadcast extension from the extensions section to be able to use the sprite. So we can send any message to the sprite we will use. we add the same plugin with sprite selected

After adding the arduino uno from the devices section, we
write the following codes in it.
For All Scratch Examples CLICK HERE
For Mblock With Arduino Examples CLICK HERE
Comments
Post a Comment