We will make an example of pacman game making with Scratch. Before starting the Pacman Game example that we will do with Scratch, we download the background for the pacman game from the internet and add it to the backdrop part in Scratch.

When the
background I downloaded was dark, I painted the dark colors with white. I made
the borders thicker. After adding our background to our work, it came to
creating the pacman character.

I drew a full
circle in yellow for the Pacman character. After that, I drew two lines towards
the center using the line tool. I erased the remaining part with an eraser. If
you want, you can use the erase background tool to erase between two black
lines. Thus, our pacman character took his place with his mouth open. I created
a guide dot right in front of the pacman character. This will keep us moving. I
created a red dot. It's a little obvious, you can make this red dot smaller if
you want, you can give it another color and make it more invisible.
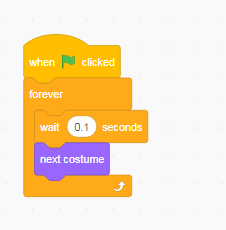
After creating
the Pacman character, it's time to open and close this character's mouth. Above
is the code that works. When the green flag is clicked, it waits for 0.1
seconds continuously to switch to the next disguise. There are 2 disguises in
our pacman character. The first is a full circle (as if its mouth is closed),
the second is a circle shape that we delete a part of with the line tool (as if
its mouth is open).
After doing the
mouth opening and closing movement, it was time to move the pacman.

When the green
flag is clicked, we start the game by equalizing pacman's score to 0 and
credits to 3 before pacman takes action. (We add them from the Variables menu). I wanted pacman to go to x=0 and y=18 when the game started. You can
start the character from the point you want. I'm using the forever code for
pacman to move continuously. I will only use the character to rotate, not to
move each time you press the arrow keys. I'm going to use the red dot I added
inside pacman to keep it moving. If the red dot touches the white color (by
white I mean the ground color) go 2 steps. Red, if the color touches the
columns (blue color) and not the white color, it will stay there motionless. Thus,
we have prevented the pacman from moving when it touches the edges. Our next
controls, if the arrow keys are pressed, we made it turn to the necessary
directions. Of course, in order to determine the direction of pacman while
moving, we used the code from the control menu, and we made it turn in the
direction of whichever direction button was pressed from the Sensing menu.
We moved Pacman.
Now it's time to eat the orange dots, destroy them and get points in return.

When pacman (that
is, use two) touched our orange dots, hide our time point and release the
orange1 news. Let me release a different news issue whenever pacman(dummy 2)
touches each point for point increase. This is when the news was released
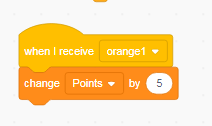
Increases the
initial score of 0 by 5 points. We have 25 orange dots in total. 25 different
news will be released. The game will be over when 125 points are reached. This
code is written inside the pacman character.


Let's move the
pacman monsters. When the green flag is clicked, pacman monsters will appear
and go to x=1 and y=18. In order to move continuously, we write the coordinates
of where we want to move the monsters into the forever command and apply the
glide command in this second. It is entirely up to you where you want to move
the monsters, it is enough to print the coordinates of the place. Now, the
actions that will take place when the pacman monster touches pacman;

When the monster
touches pacman, we will release the news called score to reduce the credits. I hide the monster instead of pacman. After 1 second, the monster is
visible again and its movement continues. You guys can make pacman private.

We were making a
news when the monster touched pacman. When this news comes, we check the
remaining life, if it is 0, we say you have no more life and stop the game. If
the remaining health is not 0, we subtract one. Then we check again. If the
remaining health is 0, stop the game. We write these codes inside the pacman
puppet.
Note: When all
the dots are defeated in the game, it can be passed to the 2nd level and pacman
does not enter from one side and exit from the other side, in addition to
these, you can increase the number of monsters. By doing these we can improve
the game.
To download the source code of the program CLICK HERE
To see the running version of the program CLICK HERE
To download background of Pacman CLICK HERE
To download the beasts of Pacman CLICK HERE
For All Scratch Examples CLICK HERE
For Mblock With Arduino Examples CLICK HERE
Nice
ReplyDelete