We will make the example of a line following car with the Scratch program.


For the line following car sample application that we will do with the Scratch program, we will first make a car track. For this, the scene in the lower left is selected. Then, we click on the backdrop in the middle of the Code and Sounds tab, which is in the middle of the screen. Here we select the circle icon, specify the color of the track, and then draw a circle, outlined circle. Let's draw the edge of the circle in bold.
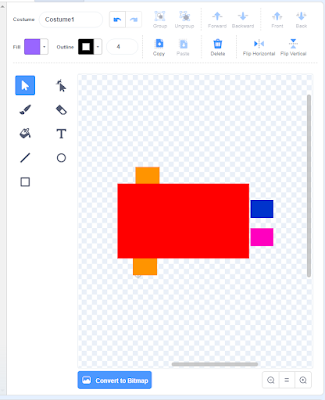
Then we click on the pencil icon in the sprite part (Draw a paint).
Here we draw a rectangular car. We draw two small squares. These will be the
wheels of the car. We draw two much smaller rectangles. We do two of these with
different colors. Because, so that we can control more easily whether it is out
of line or not. We put the car on the black line of the track. The most
important point here is that we are making the car smaller. Two colored
headlights on the front of the car should be just above the black line. If one
of the headlights goes beyond the black line and sees the ground color, the
codes we have written may not work as we want.

Let's come to the codes we will write inside the car. When
the green flag is clicked, we write the coordinates of the place where we want
the car to stop. Wherever we left the program running. The car will always be
at that coordinate. If you turn 90 degrees direction, when the car starts every
program, it will start counterclockwise at the coordinate we specified. Then he
came to move our car and check if it was out of line. Our car will move on its
own, not with the arrow keys. For this, we add the Continuously forever code
from the Control menu. Our car will go 3 steps in every move. Now, we check
with the if code whether our car follows the line while it is moving. There are
two possibilities here, if the car slides to the right, first the right
headlight will touch the white ground and the left headlight should still be above
the black line. The other possibility is that the car may slide to the left,
first of all the left headlight will come out of the line and the right
headlight should be above the black line. If two possibilities will occur at
the same time in the code, we add the code And from the Operators menu, and if
the colors we will choose from the sensing menu touch each other? We add the
code. Does the blue color touch the white color (right headlight touch the
white ground?) is the left headlight color on the black line? while we are like
this, we turn the direction of the car to the right by 15 degrees (you can
adjust this degree according to yourself). We do the same for the car shifting
to the left.
To download the source code of the program CLICK HERE
To see the running version of the program CLICK HERE
For All Scratch Examples CLICK HERE
For Mblock With Arduino Examples CLICK HERE
Comments
Post a Comment