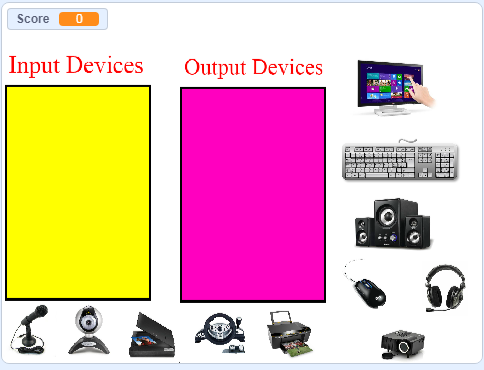
In this application, we will make a game of computer input and output hardware units with the scratch program. The game will be as follows; The user will be prompted to drag and drop pieces of hardware into the input and output device areas. If the user places the piece of equipment in the correct area, he will receive 5 points, if he places it in the wrong area, he will lose -5 points. Now it's time to code our game in the scratch program.

First of all, we draw the sprites on which we will place the input and output hardware units from the costumes menu. After that, we add the hardware units that we downloaded to our computer before and the emoji expressions and the sound of applause when it is right or wrong.

Let's come to the
code part;

When the green
flag is clicked, when the application restarts, we set the score to 0 and fix
the screen hardware piece somewhere on the screen. We do this with the command
to go to x and y coordinates from the Motion menu. There are two
possibilities for us to move this piece of hardware wherever we want, the first
is pressing the mouse, the second is by choosing the colors of the place we
want to move it. For this, we take the "If" code into the repeat code
from the control menu, and we get the code and from the "Operators",
which will meet our two conditions at the same time, into the space inside.
Click the mouse in the "Sensing" menu? and we place the color
codes. Since the display is the output unit of the hardware part, first of all,
we choose the color of the area where the output devices are collected, that
color is pink. If these two conditions are met, the correct news is released.
For each piece of hardware, the right news is released with a different name.
Then, after leaving the screen hardware piece in that area, we determine a
certain coordinate from the motion menu to go to a certain place and make the
piece go there. So we get 5 points. With the stop code that we added from the
control menu, we stop all codes related to the screen or that hardware from
working. You can also move it to the wrong place of the screen. Again, we
control this with the And command. If the mouse is pressed and the yellow color
is touched, the screen image goes to the coordinate we have determined, which
is also in the pink area. We are warned that this hardware is an Output device
and we lose -5 points.
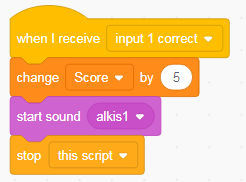
If she put the
hardware in the right area, when the correct news is released, we increase the
score variable by 5 points and start the clap sound

If we've dragged
the gear into the wrong area, we're reducing the score variable by -5 points
when false news is released.


Code for the sad
emoticon icon to pop up when we drag and drop hardware to the wrong area
Since the codes and logic in other hardware parts are the same, I did not include them one by one.
To download the source code of the program CLICK HERE
To see the running version of the program CLICK HERE
For All Scratch Examples CLICK HERE
For Mblock With Arduino Examples CLICK HERE
Comments
Post a Comment