Before moving on to this application, we had done the LEDLighting with the Potentiometer. You can learn the installation of the potentiometer and the necessary materials here.
I add 3 apples (you can increase the number of apples) and 1
basket from the new puppet part.
Here are the codes in Apples:
Since the green flag is clicked, we add the code to get our
variable number of apples 0, which we created from the data section. If we do
not add this, the number of apples collected will continue from where it left
off if the game was played before. We take the code that generates random
numbers from the operations menu and add the code that generates random numbers
into the code to go to the x and y point that we added from the movement menu
so that the apples come out randomly in a horizontal place. Here, we write the
starting points in the range in which we want the apple to come out. and we
make the apple appear. Apple, we're adding the repeat code from the control
menu to make it move from top to bottom. Our apple will move down, that is, on
the y-axis, for this we add the code to increase y from the movement menu.
However, we say increase y by -2 since our direction of movement will move in
the downward direction, that is, in the negative direction. Here we have two
possibilities. 1. The apple can touch the bottom edge of the screen by
constantly moving down. In this case, we want our apple to be hidden. We are
using hide from view code. Since we add 3 apples, we wait for 2 seconds and
then make them appear randomly in the coordinates we will determine. Our second
possibility is that if the apples touch the basket, when the apple touches the
basket, the apple will be hidden and the news of the touch to the basket will
be released. Because when this news is released, the number of apples collected
will increase by one. The hidden apple will appear to spawn from a random
location after 2 seconds. Thus, with 3 apples, we will ensure the emergence and
movement of the apple continuously.
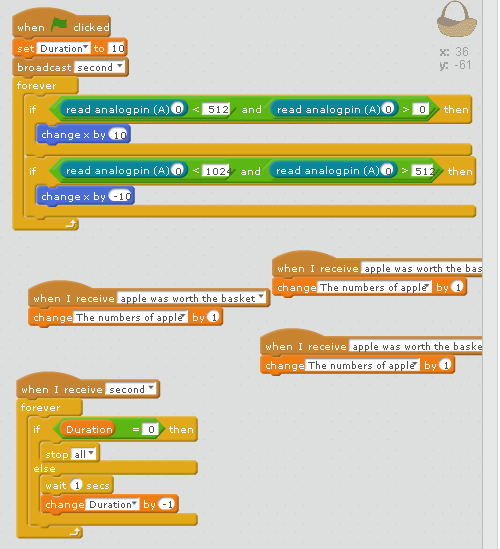
Codes in Basket:
When the green flag is clicked, I set the remaining time to
10 for testing purposes. You can extend this period. If it is seconds, we first
check the remaining time in the repeat code. If the remaining time is 0 we add
the stop all code which will stop all the puppets. If the remaining time is not
0, wait 1 second and add the code increment -1, which will decrease the
remaining time by 1. When the apples touched the basket, the news was spread
that the apples touched the basket. When this news comes, we increase the
number of apples collected by 1. The movement of the basket will move according
to the value of the potentiometer. The potentiometer is connected to our A(0)
pin on our Arduino board, and if this value is between 0 and 512, it will move
to the right. If it is between 512 and 1024, it will move to the left. For
this, it is sufficient to turn the potentiometer to the right and left.
Note: In order to run these codes, after connecting our
arduino board and circuit to the computer with a usb cable, we first select the
Serial port from the Connect menu, then select the port to which our arduino
board is connected. After selecting it, we will have uploaded the codes we
wrote with the firmware update from the connect menu again to our arduino
board. Thus, our program becomes ready to run.
Similar Topics


Comments
Post a Comment